
This is a hands-on tutorial to help you deploy a web service or application to AWS EC2 and configure Cloudflare to manage your domain fully automated infrastructure with Terraform, Docker, and Github Actions.
Photo by Lucas van Oort on Unsplash
This tutorial is suitable for developers who want to deploy the application to the server for testing or small production scale purpose only, but you can adopt or improve any part as your needs. The application will be running in a single EC2 instance.
Before you start this tutorial, you may want to check the prerequisites to follow this tutorial:
AWS account: you can register for the free tier, we will use AWS to host the custom AMI and create an EC2 instance (t2.nano or t2.micro is just fine).
Docker Hub: we use Docker hub for hosting our application image, you might want to use Amazon ECR but the free-tier is allowed to get 500MB-month for one year.
Cloudflare account: we use Cloudflare to manage our domain DNS records as well as an inbound proxy.
Some software you need to install on your machine:
AWS CLI: It’s necessary for provisioning the EC2 instance and uploading Amazon AMI.
Terraform: We will use our local Terraform CLI to try and develop the TF script.
Packer: We use Packer to build the machine image for OS and dependencies.
Docker: To build and run your Docker image.
You can use your existing or create a new project directory, the overall structure could look like:
├── backend
│   ├── Dockerfile
│   ├── app
│   │   ├── __init__.py
│   │   └── main.py
│   └── pyproject.toml
└── infrastructure
    ├── packer
    │   └── aws-docker.pkr.hcl
    └── terraform
        ├── main.tf
        ├── terraform.tfvars
        ├── variables.tf
        └── versions.tf
No need to care about the backend folder, I put it there for the demonstration purpose only.
Write Terraform configuration
By default, Terraform will load all *.tf files to load the configuration, you can totally write all configurations in a single main.tf file, but here I would want to split into multiple files to help easier to maintain.
At first, we create a versions.tf file to maintain Terraform providers using this snippet:
terraform {
  required_providers {
    aws = {
      source = "hashicorp/aws"
    }
    cloudflare = {
      source = "cloudflare/cloudflare"
    }
  }
  required_version = ">= 0.14.9"
}
Here we are using AWS and Cloudflare providers. You can omit Cloudflare providers if you don’t intend to use Cloudflare to manage your DNS record.
Next, we create a main.tf file to manage resources and configurations for Terraform:
provider "aws" {
  region = "ap-southeast-1" # aws region
}provider "cloudflare" {
  email     = "your_account@cloudflare.com" # cloudflare email
  api_token = "cloudflare_api_token" # cloudflare api token
}
For the AWS provider, I would recommend declaring the default region. For full AWS provider reference, please check here.
For the Cloudflare provider, let’s take a look at the reference here.
Using Packer to build Amazon AMI
Next, we will create an EC2 instance resource, this is the server to run our Docker application, we can choose any OS that supports Docker but here I’d like to use Ubuntu with Docker installed. We will use the aws_instance resource to manage this action. You might want to check the full reference of aws_instance resource here. The aws_instance resource requires AMI to use for the instance, AMI is Amazon Machines Images you might see it when you launch a new EC2 instance on AWS console.

Because we use Docker to run the application, you can search for an AMI by Docker, there are some available AMIs that installed Docker, but almost all of them are Deep Learning AMIs and that installed a lot of extra stuff and they are not available for free-tier. To solve this, I would propose to use Packer to build the AWS AMI that is based on Ubuntu and install Docker.
Create a new directory: packer then create a ubuntu-docker.pkr.hcl file with this snippet:
packer {
  required_plugins {
    amazon = {
      version = ">= 0.0.1"
      source  = "github.com/hashicorp/amazon"
    }
  }
}source "amazon-ebs" "ubuntu" {
  ami_name      = "packer-docker-aws"
  instance_type = "t2.nano"
  region        = "ap-southeast-1"
  source_ami_filter {
    filters = {
      name                = "ubuntu/images/*ubuntu-focal-20.04-amd64-server-*"
      root-device-type    = "ebs"
      virtualization-type = "hvm"
    }
    most_recent = true
    owners      = ["099720109477"]
  }
  ssh_username = "ubuntu"
}build {
  sources = [
    "source.amazon-ebs.ubuntu"
  ]
  provisioner "shell" {
    inline = [
      "sudo apt-get update",
      "sudo apt-get install -y apt-transport-https ca-certificates curl software-properties-common",
      "curl -fsSL https://download.docker.com/linux/ubuntu/gpg | sudo apt-key add -",
      "sudo add-apt-repository 'deb [arch=amd64] https://download.docker.com/linux/ubuntu focal stable'",
      "sudo apt-get update",
      "sudo apt-get install -y docker-ce",
      "sudo usermod -aG docker ubuntu",
    ]
  }
}
The syntax is similar with Terraform because they use HCL and you can check this tutorial to learn more about the Packer configuration, they explain every block in detail. But I would want to highlight some blocks.
Source block amazon-ebs is one of Amazon AMI builder types, it is EBS-backed AMIs and generally recommended by Amazon. You can check more AMI Builders here. In the amazon-ebs configuration block, it is required to choose instance_type which is EC2 instance type to use while building the AMI. The second required field is source_ami but we can use source_ami_filter to filter then populate. The full reference for the filter you can take a look here.
Next, you will add a provisioner to the template, this allows you to completely automate modifications to the machine image, you have options to use shell scripts, file uploads, or integrations with any modern configuration management tools such as Chef, Puppet, or Ansible… you can take the full available options here. In the snippet above, we use shell to install Docker.
Now, we initialize the Packer template
packer init .Build the image with the provisioner. This process also publishes the AMI to AWS, so make sure that you have installed and configured AWS CLI with the account that is granted enough permissions to complete this task. You can refer to this policy document to update the Amazon IAM user group permissions. To me, I used: AmazonEC2FullAccess
packer build ubuntu-docker.pkr.hclYou can check the log to see what’s going on, generally, the steps for AWS AMI builder are:
Finding the base AMI
Creating the keypair and it is assigned to a security group
Launching an AWS instance
Authorizing access by the key pair created by the last step
Executing the inline shell script
Stopping the AWS instance
Creating AMI
Cleaning up temporary files
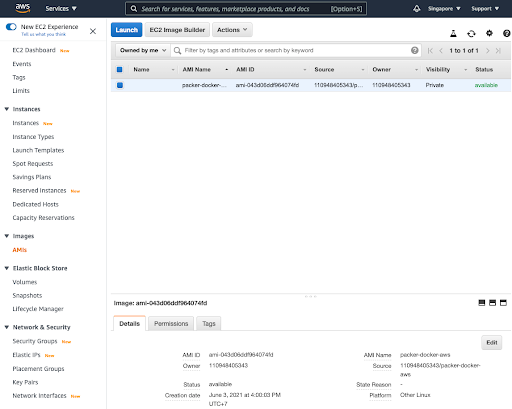
In the output, you will see the AMI ID, you can visit the AWS AMI page to verify that Packer successfully built your AMI.
Next, now we have our necessary AMI and come back to terraform/main.tf file and add this snippet:
resource "aws_instance" "your_server" {
  ami           = "<replace_your_ami_here>"
  instance_type = "t2.nano"
  tags = {
    Name = "YourServerInstance"
  }
}output "instance_ip" {
  description = "The public ip for ssh access"
  value       = aws_instance.your_server.public_ip
}
Initialize Terraform with this command
terraform initYou can use terraform fmt to format your HCL code then terraform validate to validate your configuration. You might want to use terraform plan to review your infrastructure.
Now we can roll out our infrastructure with this command
terraform applyIn the shell, you will see the plan and the question to ask you for the confirmation to act type yes to approve.
If the message shows Apply complete! you’ve now created infrastructure successfully. You can visit the AWS console to see your running EC2 instance running.
Now, we have the running EC2 instance, you might ask how to access the newly created instance?
That is a valid question, we have to do more 2 extra steps:
Add an authorized ssh key
We need to add a key pair to access to EC2 instance by using the aws_key_pair resource. Open terraform/main.tf and add this snippet:
resource "aws_key_pair" "deployer" {
  key_name   = "deployer-key"
  public_key = "<replace_with_your_public_key>"
}
You can check the specification of the key format in the AWS documentation. Here I will assume that you installed Git and ssh-keygen utility. To access the EC2 instance from your computer, you can get the public key by:
cat ~/.ssh/id_rsa.pubIf id_rsa.pub is not available, you can type ssh-keygen to generate the new one. It is as simple as copying the public key to Github to check out the code by SSH.
Back to modify the aws_instance resource, we have to add to key name, now the aws_instance block should be:
resource "aws_instance" "your_server" {
  ami           = "<replace_your_ami_here>"
  instance_type = "t2.nano"
  key_name      = "deployer-key"
  tags = {
    Name = "YourServerInstance"
  }
}
Update the security group to allow inbound access by port 22
You can config the access by using the aws_security_group_rule resource. But for simplifying, we can access Security Groups in the AWS console to edit the inbound rules to allow accessing port 22. In this configuration screen, you might want to update the inbound rule for your application to make it accessible. Normally you can set it to allow HTTP access (port 80), later in this post, we will config Cloudflare to manage our DNS record, SSL Support, or if you want to use Cloudflare proxy, please refer to this documentation to choose the port.
Yay, now you can just type terraform apply then yes to approve the changes.
(Updating)
You can get the full sample project here: https://github.com/hieuhani/terraform-docker-aws-bootstrap